Rainbow Week

Here are our activities for Rain/Rainbow week. We started to do themes for our play/school and I enjoy it. I don’t think it benefits the kids that much, but it makes play more fun for Mommy. We were hoping for rain and and rainbow would have been awesome…we ended up with a bit of rain and a snowstorm. (I shared these photos before in a previous post, but decided to go back and edit.)

Paper squares. Simple and fun. confetti

We squirted an old piece of fabric with watered down paint. I think Mommy enjoyed this more than PB. It was way fun. 
art project

bin
This was C’s first real sensory bin. I was happy to see that he didn’t try to eat all the colored rice. PB had a hard time sharing at first, but he eventually realized it was either play with C or not at all. 
playbin
PB pointed out that pouring the rice down the stacking cups sounded like rain.
ricerain

PB enjoyed this simply math activity. At first I didn’t have raindrops on painter tape for all of the numbers, but I was quickly making more so PB could do the whole set 1-12.
rain cloud
rainclouds


We also played outside with an umbrella and hose. Later on we played umbrella tag in the rain. PB or I would have the umbrella and run away, the other person would come steal the umbrella, lots of laughing too.

Indoor Transplants Part 2

This is part two for this first post.

My seeds germinated. I turned on the overhead light just as soon as I saw green coming up. After a couple of days, I went ahead and transplanted the seedlings to containers.This was nine days after I seeded them. My peppers were slow: I did those five days later.

seedlings

To transplant, I filled containers up with loosely packed potting mix. I poked a hole in each cell where the plant would go.

From the seedling tray, I worked my finger underneath the soil, loosening the roots and pulling the plant up from the bottom. If I would have pulled on the top it rips the plant from the roots. (So don’t do that.)

Then I placed one seedling in prepared container and pressed the potting mix back in the hole.

after

They looked very wimpy and sad at first. But I kept them moist the light on and in a couple of days they were perky again. I had 100% transplant rate at this point, unless you count the couple that my baby got into and I had to re-plant. Here they are today:

seedlings

Final steps for transplants:

  • Keep the light on, about two inches above the plants. I’m actually going to go ahead and double up on my lights because some of the plants are getting a bit long and leggy. I turn off the light at night.
  • Keep the soil moist, but not soggy.
  • Fertilize as needed. My potting mix has a bit of fertilizer in it, I’ll probably put on some slow release granular fertilizer I have on hand in a week or so. The nursery fertigates about one a week…and there are organic options too. If the plants ever have yellow leaves, fertilize.
  • Once a transplant has 5-6 leaves, and the weather is right, it is time for hardening off and transplanting.

Just a little note. I actually did a lot of this process this way because of the supplies I have on hand. If you don’t have anything on hand,  you can use different methods, like soil blocking, organic fertilizers, etc. I love to try new more sustainable methods, but it makes sense to use up the materials I already have first. And I’m also a bit lazy.

I just noticed that taking pictures is invaluable. My son ripped out the tags, but there they are, all labeled in the picture.

Family Pictures

Everyone should have relatives who like to take pictures, and who are hopefully good at it too. My sister came and visited. (I loved having her over. She liked it too.) She took the following pictures for us.

family 4-small

family picture - Copy

familyb

The next ones are just playing together outside. 
funny

This one is funny to me…in the background is Peter and he is stuck. He was rescued soon after. peter

raking

cous

Peaceful Parent, Happy Kids

I am recommending a book. It is awesome. I have changed what I am striving for as a parent, and I believe I am now closer to how God would want me to interact with my kids. And I’m not a perfect mom…but I do feel like I know more options when it gets rough.

Peaceful Parent, Happy Kids: How to Stop Yelling and Start Connecting, by Laura Markham

The author also has an awesome website and newsletter, here.

Life Expectations

Sometimes I plan too much, my expectations are focused on tasks, productivity, predictability.

I have days where nothing goes according to plan. Sometimes they are bad days where everyone is very grumpy. But other times they are wonderful where instead of napping, we play with play-dough; instead of TV, we fly a kite. My to-do list might not get shortened, but what I really want to do, I do more of: play with and comfort my children, spend time just talking with my husband, and garden or read a good book.

Sometimes I look froward to nap time, where I can do a whole lot by myself. But it is better when I look forward to when the kids wake up, when my husband walks in the door, when I get to spend time with the people I love not really doing anything.

Indoor Transplants: Part 1

I just got my first batch of seeds for indoor transplants in. Yea! I had a request for a how-to. There is actually a lot of methods and variations in steps. Google can tell you more (or if you are more old-school you can actually look in a book).  I’ll just share how I do mine, and say why as well.

Step 1:

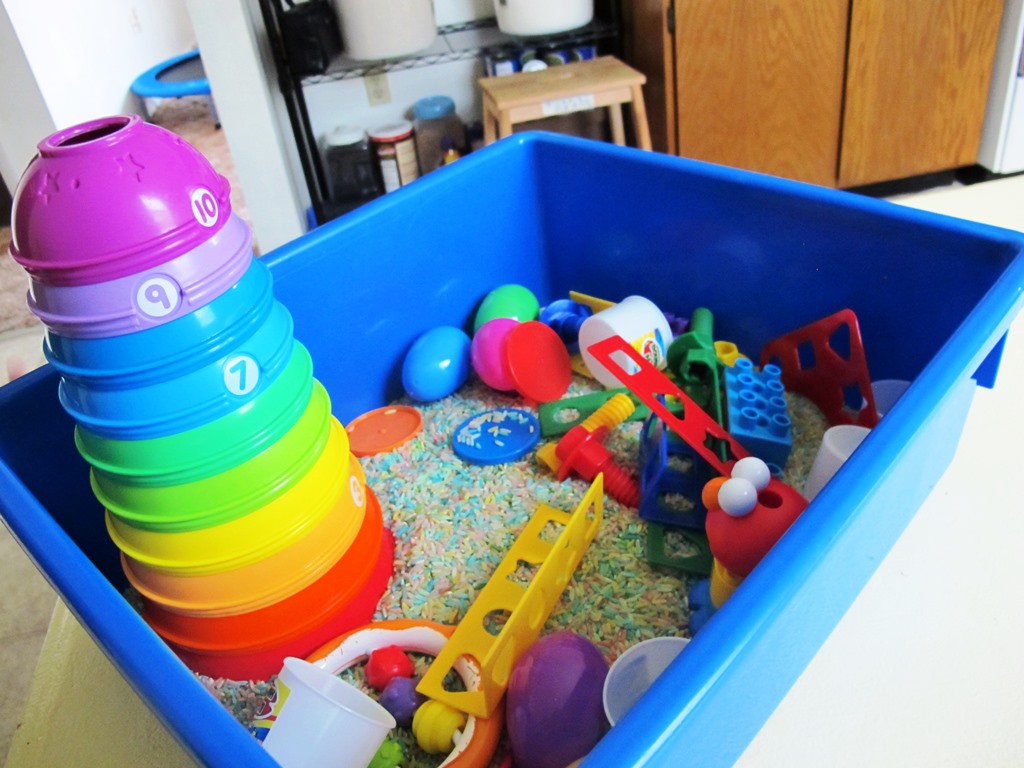
Find a place. An extremely sunny window might work. But usually even sunny windows really aren’t getting that much light. So you will need artificial light. I made my setup two years ago with old metal shelves and shop lights. It is currently shoved into my laundry room. The laundry room is actually a happy place because it is equipped with a drain for water spills,  it stays warm and more humid due to the dryer and heater/water heater, and it is the only place in the house that is off limits to the kids. One little guy likes to eat anything he can get his hands on, so this was a must. I did it in my bedroom before, on the carpet (which was protected by plastic). If you aren’t in a smallish rental, you probably have more options.

set up

You do not need to buy more expensive grow lights. It won’t help that much. If you are only doing a few, a compact fluorescence bulb and lamb might work. Just stay away from incandescent because they produce too much heat.

Step 2:

Get some seeds. Most of mine are from Johnny’s, Burpee’s and the grocery store. I’m not opposed to cheap seeds, but mail order certainly has more and cooler varieties.

Step 3:

Prepare the seeding mixture. I use a seeding/cutting mix because it has a finer texture and is excellent for new roots to grow in. It was very dry, so I added lots of  water in a bucket and mixed.

mix

Then I spread it out in a tray and let it drain.

tray

Step 4:

Label the row, and then make a furrow for the seeds. The seed depth is listed on the package, or about twice the diameter of the seed.

furrow

Step 5:

Sprinkle seeds in furrow. Cover. 

seeds in

Step 6:

Ensure the soil is moist, but not sopping wet. A spray bottle is much better than a watering can, because you want to mist the seeds, not drown them.

watering 2

Step 7:

Put a cover on. I used a garbage bag. They make cool plastic covers. A garbage bag is much cheaper.

finished

If you have a heat mat, use it. Seeds will germinate better in warmer temperatures. I’m too cheap at the moment to get one.

So this might be a bit different than other methods, because I just sowed about a hundred seeds in a single flat. My rationale behind this is a) it is a lot easier to prepare one flat at the moment, b) I only have to worry about one flat and germinating seedlings need special care, c)I am more sure to not have gaps when I transfer to a larger container, and d) I remember doing it when I worked in the greenhouse forever ago.

I will leave them in this set-up until they produce one true leaf, and then it is transplanting time.


Backyard

I love having a yard. We can now

  • fly kites
  • roll toy cars down the driveway
  • run around on the grass for no reason
  • eat lunch outside
  • dig in the dirt
  • garden
  • make vitamin D

And the snow is all melted. I love that it is warm enough to go outside and play! Spring rocks.

??????????????????????????????? ??????????????????????????????? baby


Germination Testing

I bought a bunch of seeds two years ago, and have a few more that I have gathered up from the past five years. I have not stored them carefully. They were thrown in a cardboard box and placed in my grandma’s bomb shelter basement while I was in Georgia. Lately, they have been in a plastic bin outside.

seeds1

I decided to test the viability of the seeds. It’s pretty easy. It turns out I have quite a batch of seeds and it took a while. Here is what I did.

I placed 10 seeds in a wet paper towel, placed that in a fold-top sandwich bag and put it on my water heater.

set out1

A week and half later I checked it all. I shouldn’t have waited that long, I just forgot. Ideally, I should have been checking them every 2-3 days.

germination1

Vegetable seeds germinate quickly and have a high viability rate. And most last 2-5 years just fine. My germination tests resulted in 90-100% for the majority of the seeds. Only a few varieties didn’t have a high rate of germination, some of which were moldy and hence need a re-test.

retest1

I’m getting excited for spring…the snow is almost melted, the weather is warming up. I’ve been pruning shrubs and found a bluemist shrub that had self-propagated a beautiful layered cutting. I re-planted it in my own garden.  The seed shelf has been constructed, and I’m planning on starting some vegetable starts soon.