Planting Tomatoes

I planted my tomatoes. A bit late, but in the past I’ve usually had them ready to go too early. My seed collection has expanded to 10 varieties of tomatoes, so I did two of each and six romas for canning. Adding the tomatoes to my shelf filled it right up.

seed starter.jpg

Oh, and today was a day of phone calls. I made about six different phone calls today. Not a big deal really, but I tend to avoid calling people. I prefer texting and e-mails. Today I sat down and made all the calls I had been putting off.

batmand and robin.jpg

Batman and Robin

I didn’t feel great today, I’ve had a headache most of the day and I’ve been pretty anxious. Which luckily is not normal for me. FHE.jpg

This is our normal Family Home Evening. Frowns, wiggles, and messes from treats. With a parent trying to make it at least partly spiritual.  chair.jpg

Moving

My domain is expiring. I want to change the way I write and approach things. My return readership is low, as far as I can tell. I’ve made the decision to end this website …but don’t worry!

New and past content will be going to lizdee.org. I’m still working on the site. It will be up in a few weeks!

Stairs Part 2

Part 1

We stained and glued down the treads, caulked, filled nail holes. Added a rope railing. The stairs are mostly done, and I love them and think they are beautiful.

Before/During

After

stairsc (3).jpg

A lot of people who’ve seen my stairs through the process have remarked that they aren’t as steep. We did nothing to change the steepness of the stairs, I think that was a side benefit of the whole project.

Table

I end up redoing projects a lot. Our dining room table holds the record. I got the table from my mom after we moved into our second apartment. I wasn’t a big fan of the yellowed, knotty pine finish. We painted it red, without any sanding or finish coats. That lasted a while, but the paint began to peel off.

We refinished it in yellow and green, this time with sanding and finish coats. It lasted a lot better. But the tabletop started to chip, and the finish was never that smooth.

I didn’t want to paint the table again. I got the idea to simply put on a new table top. The table was narrow, so at the same time we fixed the tabletop we could also make it wider.

While at a home re-store, I found some leftover acrylic panels. We bought them for $2 a piece. Three across made the table top. After sanding down the top, we attached them with epoxy glue. It was a very simple solution, and I like my table more now.

It went from too narrow to too wide, but that’s okay. I also learned that more coats doesn’t mean a good paint job. The paint job still chipped and didn’t look great because we didn’t take the time to really research how to do refinish furniture well. I sanded down through a finish coat, paint and primer. It took a long time.

Working

I told myself I wouldn’t re-arrange the upstairs furniture for about a year. At least not until we finished the basement. Everything was just fine, and moving furniture around was a waste of time. I made it four months.

My resolve disappeared. Re-arranging furniture is like getting a new house. It’s fun to try something different. I’m always looking for ways to make it better, and overall it’s a pretty quick project. I still feel like I lost a bet though. But it’s to myself, so I kind of still won too, right?

The office is back to being the dining room, and the large living/dining room is now just a living room.

living area

Before

living area b

Now

Is it better? Yes, for a big family party. I like the dining room in the back, it is closer to the kitchen. It still could use a bit of fine tuning, and I’ll decide more after I live with it for awhile. I have realized that nothing is perfect. Maybe I got a bit closer.

And we finished-ish the stairs. I’ll get more pictures soon!

Stair Teaser

In our home, there were the most awful stairs ever. They are the stairs that kicked off our re-model project because the tall people living here were tired of hitting their heads or ducking. The stairs that have been occasionally slipped on with cheap carpet. The stairs that have walls that nobody bothered to do more than put on a coat of primer, not even adding a layer of texture or mud.

old

After  we lowered them down so we didn’t hit our head, I decided I did not want to keep big-box special awful tan carpet on them. I had seen blog post of people who removed the carpet and had painted or stained them, and thought we could do the same. This is what we were left with after carpet removal:

Painting them didn’t seem like a good option. They were not in good shape. There were gaps, uneven boards, rough surfaces. I had looked at stair restoration kits, but they added up to more than I wanted to spend.

I despaired for bit, but got creative and found a solution. First of all, Joe attacked the stairs with a hammer and took out no less than fifty nails that some idiot, incompetent or drunk construction worker with a nail gun had nailed in our stairs with little regard to where they went. They were not holding anything together, but were making the stairs quite squeaky.

After nailing in less than half that amount, almost all the gaps in the stairs were gone, and the stairs no longer sounded like stepping on a mouse nest.

Joe and I took a trip to big-box store. (It was a date with a babysitter, because doing so with kids is a nightmare. But then I feel sheepish that my dates are to stores, because that’s what my parents did growing up and I thought it was kinda lame, but now I’m doing it.) Then I did my work of taking the kids away for an entire day and Joe worked on the stairs and I came back to this:

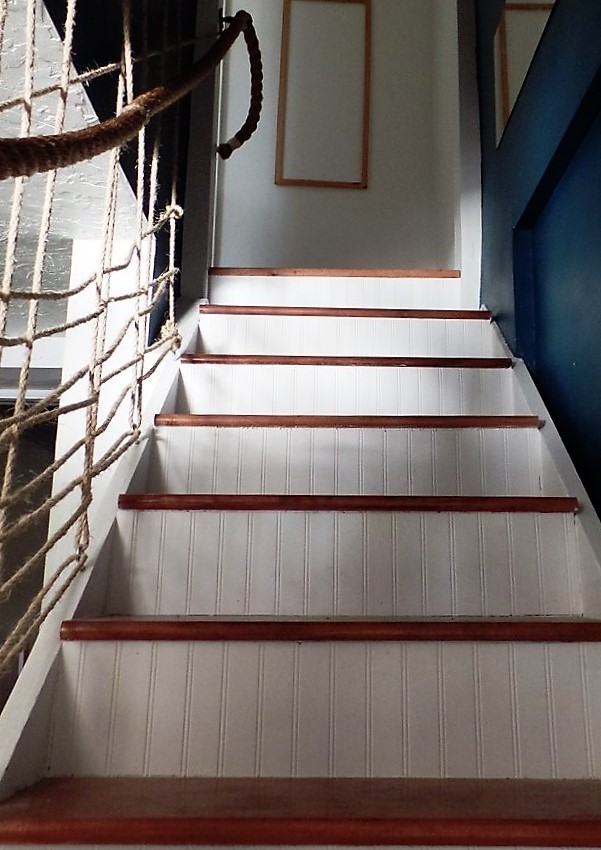
Out of all the things we’ve done to the house, this was probably the biggest transformation. It’s not done yet at all; one main reason is because the can of stain we bought was mis-labeled, halting the process of staining the new treads.

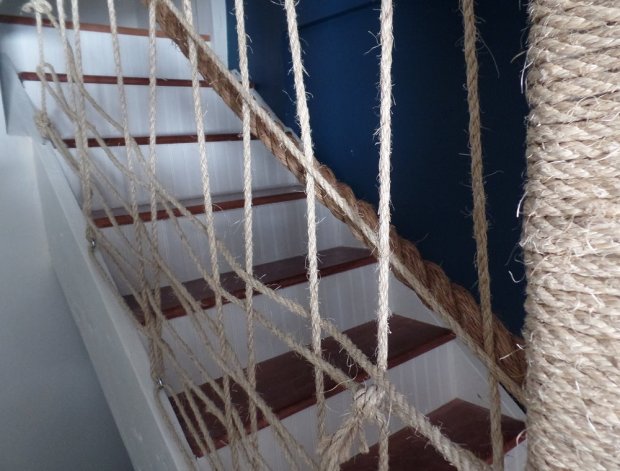
I watched stair kit restoration videos, and checked online stock and googled a bit. I came up with the idea of resurfacing the back with wainscot beadboard (about $25 for the whole sheet and we had extra), and putting on new stair treads (about $100 for pine stair treads). The stair treads did raise up the stairs by one inch, but there was actually an extra inch at the top stair anyway after creating the new landing.

I’ve got more in store for these stairs, just as soon as we get the right stain color.

Coats

We keep all the coats, backpacks, etc in the kitchen. It was messy, hard to find anything, and it didn’t look great.

before

I had thrown up some coat racks and shelves without any real thought. There was a lot of room for improvement. First step was to get rid of all the mess.

And take down all the stuff that wasn’t working.

After brainstorming for awhile, I decided to use premade crates that are available at craft stores. The kids and I painted them with paint I had on hand. It was a good project for the kdis because I wanted a rough finish paint job anyway. I sanded it a bit after. We hung up the crates and I added some coat hooks.

Looks great, but will it effectively hold all our junk… during winter, when we all have multiple coats, etc?

It’s doing a pretty good job. Every person has their own crate, with one extra that is mostly used as a charging station. I think it looks great and more importantly it is doing a much better job at organizing all our junk. Not bad for a project that cost about $60 and only took 2-3 hours.

Christmas Decoration

The only holiday I decorate for is Christmas, and even then I don’t do very much. I do love the few things I have. It’s fun to slightly change my home just for one month.

We have this nativity my mother-in-law crocheted.

The Christmas tree, with the bottom part purposefully cut off because I have a newly walking baby and it’s always a mess down there.

These candy chains are my favorite. One chocolate kiss per day between now and Christmas Eve. Unless you are three year old and lack impulse control and had to have your candy chain taken down because you ate half of it.

To make these chain, just hot glue the candy onto the ribbon. It’s really easy, and they are a lot of fun. Who doesn’t want a piece of chocolate everyday?

Bathroom

The bathroom is done! This wasn’t a major remodel, but the bathroom had some issues we needed to address.SAMSUNG CAMERA PICTURES

First off, it was tiny. There wasn’t even enough room for a regular door to open. When we moved in, there was a bi-fold closet door on the bathroom. Not ideal, even less so when my kids kept smashing their fingers in it. I took it off and put up a curtain. That’s probably even less  ideal, but at least the kids weren’t getting their fingers smashed.

Our solution was to extend the bathroom into the hall. The old hall only went to the bathroom anyway. I gained a spot to put in a vanity area and significantly increased the size of the bathroom. And we could put in a door. That closes. And locks. (Because of duct-work, the door has to swing outwards, but it’s not a big deal.)

vanity

Besides moving the doorway, we also re-did the flooring. I think the easiest way to make flooring look cheap is to put in stick-on tiles poorly. Which is what we had.

So we tore them up to the concrete.concrete

And we refinished the concrete.

SAMSUNG CAMERA PICTURES

I really love it and the plan is to finish the concrete this way in other parts of the basement as well.  It’s not perfect: this was my first time doing the concrete that way, and I made a few mistakes. I went ahead and started small, so I can now do the rest of the concrete better.

We finished the concrete by using a black concrete stain, putting on grey decorative flakes, and a couple coats of wet-look concrete sealer. (All Behr products from Home Depot.) It was an inexpensive flooring option, we always have the option to go back and put different flooring on if it doesn’t wear well. So far so good though.

Fall Leaves

I don’t have any large deciduous trees on my property, so fall leaf clean-up isn’t an issue for me. But I wish it was. Leaves are valuable! I cringe when I see leaves thrown away in regular garbage (green waste is okay if you have to). Why? Well, because they are free organic matter. And organic matter is key to good soils and gardens.

How to you transform fall leaves into good soil? Here are some ideas for using them:

1)Mow. The year I did landscaping for a condo HOA, I raked only a small section of leaves. For the most part, I’d shred them up with the mower and leave them. I did it about three different times, so I never had over a couple of inches of leaves on the ground at any one time. The leaves nicely decomposed in the ground. It was super easy. This works really well for fine leaved trees like honeylocust (sometimes you don’t even have to mow those), but will also work with the thicker leaves like maples as long as you don’t let the leaves get too thick.

2)Mulch. This year, I piled the leaves nice and high around some spireas. I needed mulch there, and fall leaves are free. About any landscape area can use a good helping of leaves. Shredding the leaves will help them decompose faster, if that’s what you want. Leaving them large can work as a good weed deterrent.

leaves

3)Compost. Leaves are great in a compost pile. They are a good high-carbon material. I put a video below that talks more about composting with leaves.

4)Annual Garden. This is probably the most common use I see: adding a nice layer of leaves to the garden. Most people till it in, either in the spring or fall. I don’t like tilling, and instead just leaving the leaves on top and using them as mulch in the spring.

One of my actual fears in life is at some point I’m going to have a lot of leaves and some kind person will feel the need to rake them up and haul them away for me. I’ve worked on service projects where we raked up all the lovely organic matter out of landscape beds and hauled it away.  I love leaves and firmly believe that they are far too valuable to end up in the trash!

Here’s someone else who loves leaves: